How the setup works
Setup happens in two separate parts — and mixing them up is the most common point of confusion. Part 1 (once, by an admin): activate the integration in Organization settings. Part 2 (per user, per app): each person who wants Signit inside Office installs the add-in on their own machine. Word, Excel, and PowerPoint share one add-in; Outlook uses a separate one.
1. Activate the integration for your organization
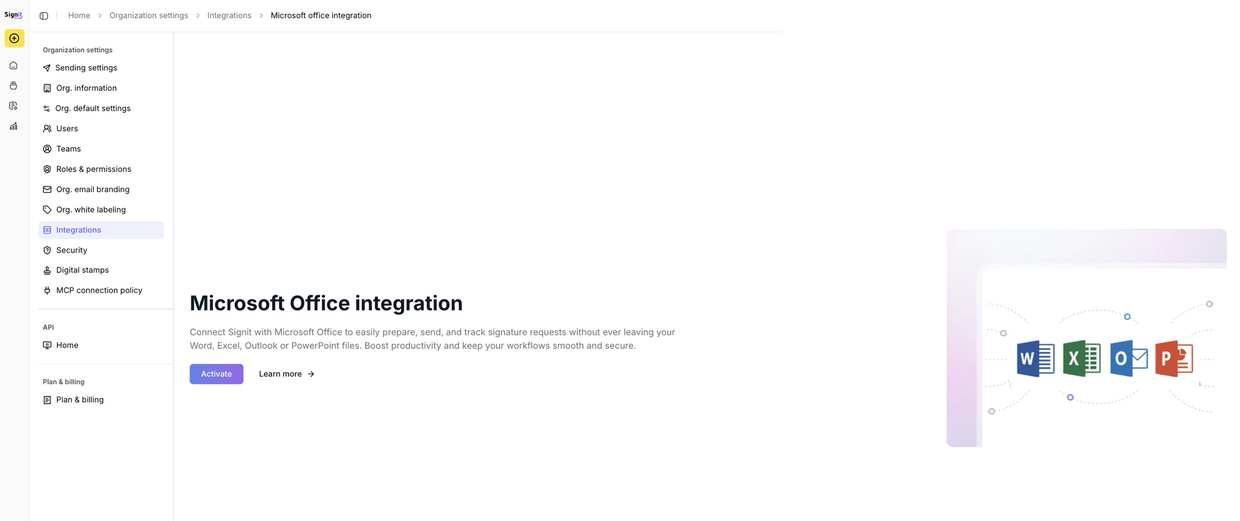
Admin · onceFrom the Signit dashboard, open Organization settings → Integrations → Microsoft Office integration, review the description, and click Activate. The status changes to Enabled right away, and the installation instructions and manifest links appear on the same page. Nothing is installed on anyone's computer at this stage.
2. Download the add-in manifest file
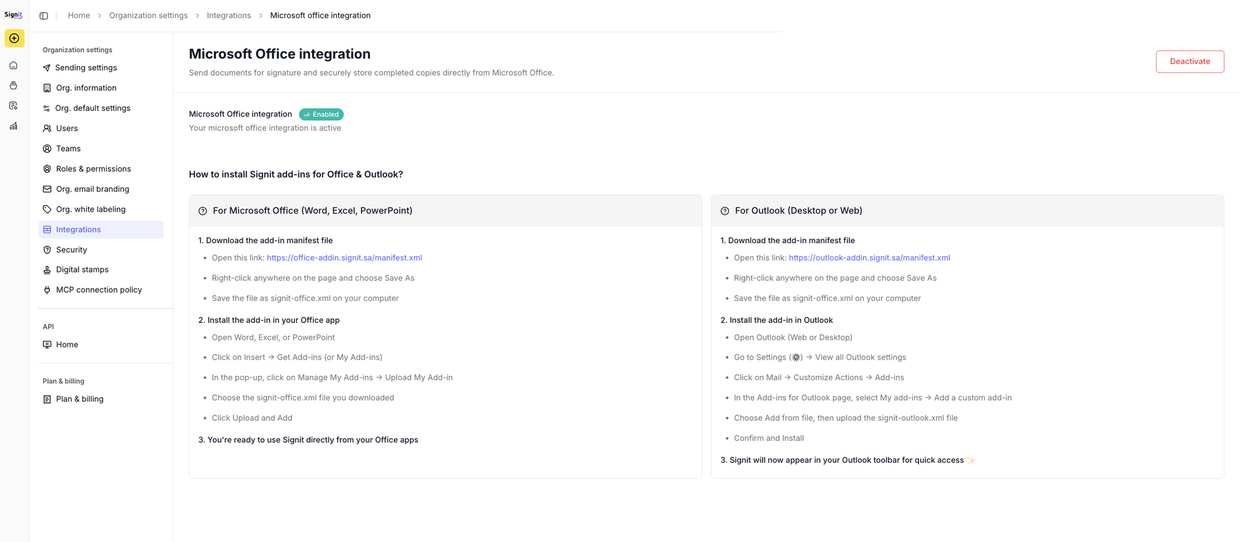
Per userOnce enabled, the page shows two sets of instructions — one for Word/Excel/PowerPoint and one for Outlook — each with its own manifest file:
- For Word, Excel, and PowerPoint: open
https://office-addin.signit.sa/manifest.xml - For Outlook: open
https://outlook-addin.signit.sa/manifest.xml
Right-click the page, choose Save as, and save the Office manifest as signit-office.xml and the Outlook one as signit-outlook.xml so they don't overwrite each other.
3. Install the add-in in Word, Excel, or PowerPoint
Per user, per appIn any of the three apps:
- Open Word, Excel, or PowerPoint.
- Go to Insert → Get Add-ins (or My Add-ins).
- Select Manage My Add-ins → Upload My Add-in.
- Choose the
signit-office.xmlfile, click Upload, then Add.
Add-ins added this way install for one user on one machine, so each person on your team repeats these steps.
4. Install the add-in in Outlook
Per userOutlook uses its own manifest:
- Open Outlook (web or desktop) and go to Settings (gear) → View all Outlook settings.
- Select Mail → Customize actions → Add-ins.
- Choose My add-ins → Add a custom add-in → Add from file.
- Upload
signit-outlook.xml, then confirm and install.
Signit then appears in your Outlook toolbar.
Before you roll this out
The upload option can be missing or greyed out — whether users can add custom add-ins is controlled by your Microsoft 365 tenant policy, not by Signit. If so, speak to your Microsoft 365 administrator.
Activation and installation are separate — turning the integration on does not roll the add-in out to your team. Share this guide with everyone who needs it.
Office and Outlook are separate installs; adding one does not add the other.
You can turn the integration off at any time with Deactivate on the same page.
Need help?
Trouble installing the add-in? The Signit support team can help.
Signit support team
Reach out for help — or contact your dedicated account manager for urgent issues.
Was this article helpful?